¶ Issue
Designing your own label layouts and using custom label sizes.
¶ Affected versions
PM8: All versions
¶ Overview
PM8 produces 3 types of labels for job manufacturing.
- Shipping labels
- Key labels
- Door labels
You may create label layouts for each of these applications. You may create as many label layouts as you want. After you create label layouts they are available to all users.
You choose the label size
There is no requirement to purchase a label size that matches the standard layouts provided with PM8.
When you create your own label layout you specify the paper size.
¶ Solution
¶ Configuring the Windows printer driver
¶ Measure the labels
Measure your label width and height accurately. This required for the printer driver setup and also the label designer.
For this example, the labels are 95 mm wide and 50 mm high.
¶ Tell the printer driver about the label size
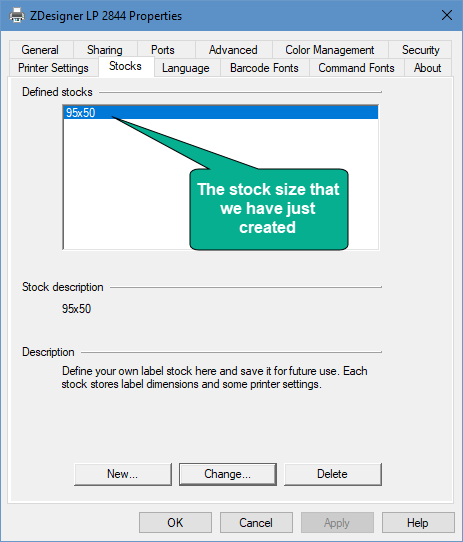
- In your Windows printers, manage the label printer and choose
Printer properties. - In the properties window for your printer, select the Stocks page.
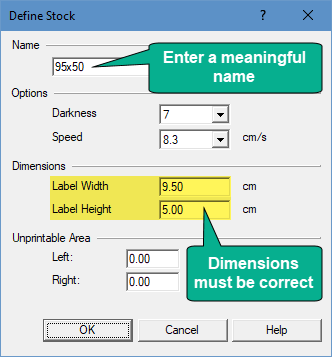
- Add a new stock size. The Name is not important, but try to make it meaningful. What is important is that you enter the
Label WidthandLabel Heightcorrectly. - Save the changes. You do not need to select the stock size as the default paper size - it will be used automatically.
Example of defining a stock size on a Zebra label printer
If you try to print to a label without defining the stock size, you will find it difficult to accurately control the layout. This is more noticeable when printing rotated text for a landscape layout. This is not specific to PM8 - it is just the way that Windows printing works and is observable from any program.
¶ Label end detection
Label printers have multiple methods of detecting the label and ensuring correct alignment. If you find that the label printer is putting a blank label after each printed label then you should consult the label printer documentation about calibrating the printer for label end detection.
¶ Permissions for label design
To design labels in PM8, you must have the permission Design labels and reports.
¶ Accessing the label layout designer
Choose your job for manufacturing and click the Manufacture button.
The Manufacture Job windows is shown.
| Label type | Accessing the designer |
|---|---|
| Shipping labels | Turn on the check-box Print shipping labelsClick the Preview buttonClick the Design labels button in the top-right corner |
| Key labels | Turn on the check-box Print key labelsClick the Settings linkClick the Design labels button in the bottom-left corner |
| Door labels | Turn on the check-box Print door labelsClick the Settings linkClick the Design labels button in the bottom-left corner |
From the Custom reports window, use Add, Remove and Edit to create or alter label designs.
¶ Using the label layout designer
For this description we will work with key labels.
¶ Adding a new label layout
- Click
Addto create a new key label layout. - Give your label layout a meaningful description.
- Click
Edit reportto access the Design Custom Label designer and make your changes (see below). - When you have finished your design, close the designer.
- Click
OKto save the Custom report.
Don't forget to click OK to save or your efforts are wasted.
¶ Initial steps and testing the layout margins
In the Design Custom Label designer:
¶ Set the units
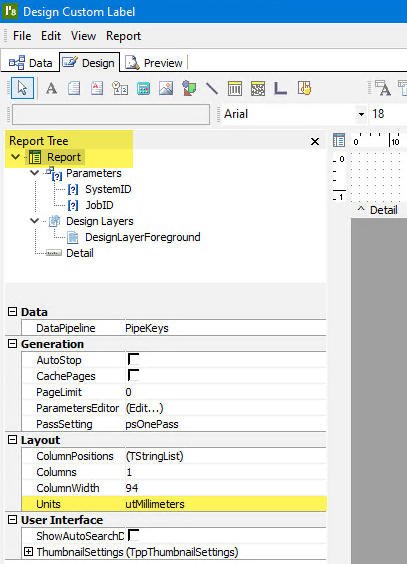
Select the units you want to work in if it is not already correct. There are several options, but choose either utMillimeters or utInches. For this example we will work in mm.
Select the measurement units
¶ Tun off margin display
Choose the menu option View then look at Margins. If Margins has a tick beside it then select Margins to turn off the tick. This is because the margin display is not helpful and makes the layout process more difficult to get correct.
¶ Set the paper size and margins
Before starting to get the data on labels it is important to set the paper size, margins and test that the margins are OK.
In the Design Custom Label designer:
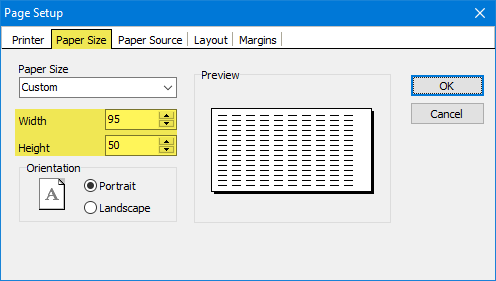
- Choose the menu option
FilethenPage Setup - Choose the
Paper Sizetab and enter theWidthandHeight. - Choose the
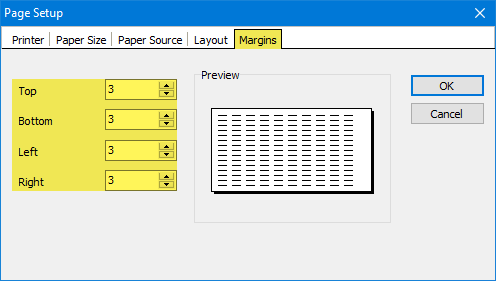
Marginstab and enter your best guess at the label printer margins. Start with 2 or 3 mm on all sizes. - Click
OKto save.
Example of paper size and margins
¶ Set the detail band height
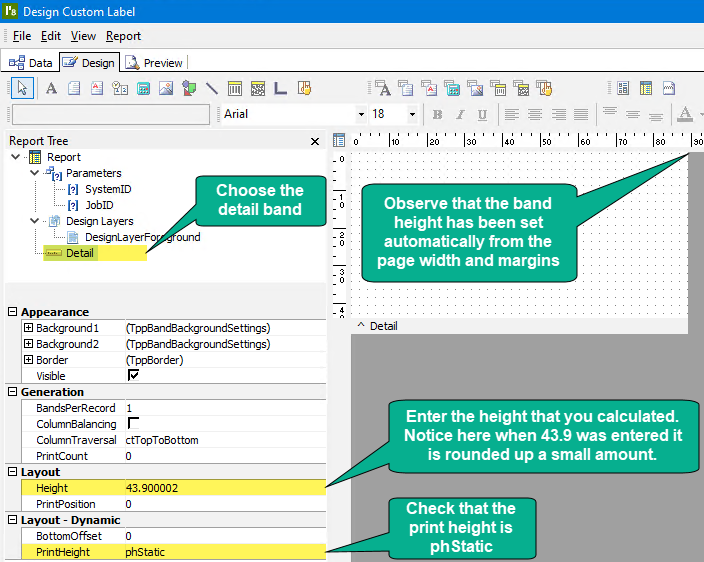
- Calculate the band height. This is the page height - top margin - bottom margin - 0.1mm
The 0.1mm is a safety allowance for internal rounding. Because internal dimensions are stored in 1/1000 inch, small rounding errors can happen on unit conversions and if you do not do this you may end up with printing issues. - Set the height for the detail band.
Example of detail band height
50 (Page height) - 3 (Top margin) - 3 (Bottom margin - 0.1 = 43.9 mm (Detail band height to set).
¶ Testing the margins
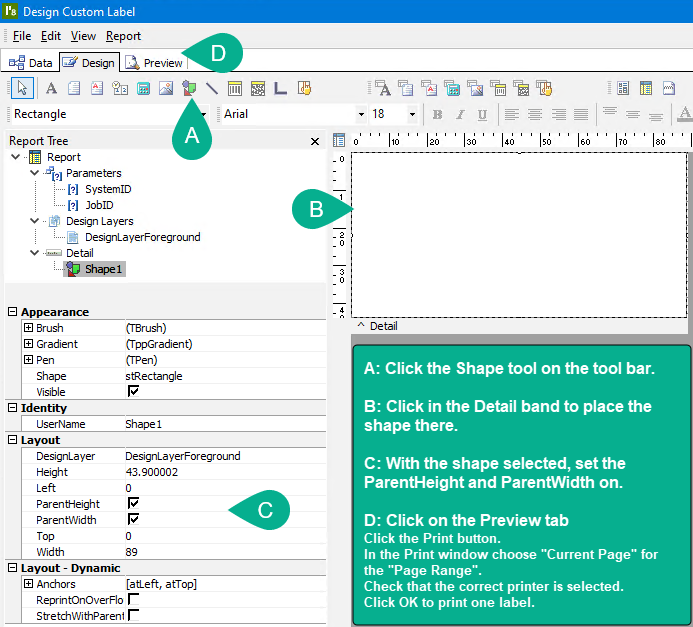
Before we start designing the label layout it is important to test that the margins you have set are ok. We do this by putting a rectangle on the detail band and setting it to full size. Then a single label is printed and the rectangle checked.
Example of testing margins
Be sure to select Current Page for the Print Range or you may print many labels.
Look at the printed label. If any of the sizes of the rectangle are not visible, or are cropped, then you will need to change the margins. If you change the top or bottom margins, be certain to recalculate the detail band height and set it to the new value. If you change the margins, test again.
When you have correct margins set, click on the rectangle to select it then delete it - we do not want it on our label layout.
Allow enough time to finish the job
Everything up to here is preparation for ensuring your labels work correctly. Whilst it has been somewhat wordy, it is really only 5 or 10 minutes work.
It takes only a minute to drop on all the data fields you want for your label (the next section in this article) but if you are a perfectionist, it is the fine tuning of the layout, sizes and positions that will take the most time.
Each time you alter the layout you should preview it and from time-to-time print it (being careful to pint just the current page) to scrutinize the appearance.
¶ Using fields and other display elements
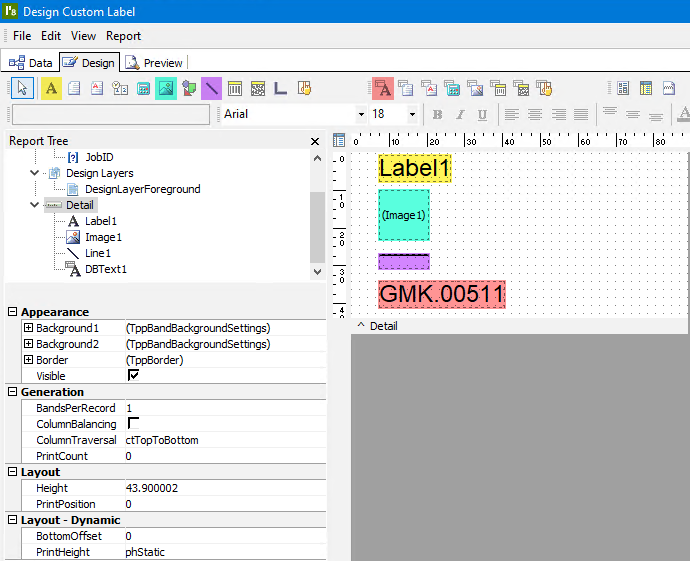
On the tool bar there are a variety of items you can drop onto the label.
Example of tools
The four most common tools are shown in the example below.
| Tool | Description | Notes |
|---|---|---|
| Label | Puts static text on the label | Set Caption and Font. |
| Image | Puts an image on the label | Set Picture. Set MaintainAspectRatio on. |
| Line | Puts a line on the label | Set Position and Weight. |
| DBText | Puts data text on the label | Set DataPipeline, DataField and Font. Also resize the field to fit the text. |
¶ Fields
For DBText fields the properties DataPipeline and DataField determine what is dsplayed.
If you want data text to wrap onto multiple lines you can use the DBMemo field.
The DataPipeline is the source of the data and the data is pre-calculated for you so all you need to do is choose the correct values.
The DataPipeline PipeJob has fields related to the job.
The DataPipeline PipeKeys has fields related to the keys ordered on the job.
After you choose the DataPipeline the DataField gives you a list of the fields available and the naming is easy to understand.
¶ Special fields
There is some special functionality in the label generator to automatically supply the values for some fields, such as your company name. See the PM8 documentation help topic Custom reports for a list of these.
